Followers

Showing posts with label miniature. Show all posts

Thursday, May 18, 2023

WOOD YOU EVER GUESS?

Hi everybody, 

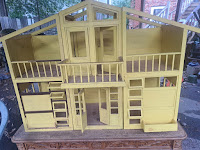
Check out my latest grab. Found this on Facebook market! You would never guess...it's a wooden replica of a BARBIE A FRAME! Separated in the three pieces,  yellow and huge it wasn't recognizable at first. I am going to be really busy refurbishing this one! SCORE!


Original circa 1978-79


For cuteness 

Tuesday, June 2, 2015

Quilting, Shopping and MYSTERY DOLL MAKE OVER!

Hi everybody!
 
I have been all over the place concerning my hobbies.  While looking for something for one project I found something I was working on a few months ago. This is my first attempt at making a quilt. The pieces came from a bunch of small precut squares for a 1:1 quilt. I know now I need to be careful about the prints and line them up better. I was mostly concentrating on making the seams and the squares even. It does not have backing or fill because it was pretty much for practice. Next I will learn about patterns. This is in 1:12 by the way.


 Here is something I have never seen before. It was in Walmart for only $5.00. You of course understand I HAD to get it. I plan to paint it. Probably yellow.  I didn't see the house just furniture for the rooms.  Sorry, it is so dark!I really need to go back and finish that light box!  


Apologizing once again for the dark pictures. This was the fourth take. Clicking on them will make them a little clearer.


Mystery Doll make over!

Here she is! I looked into my bag of wigs you may remember from a previous post.  I first tried a black wig, but thought it made her too old. I wanted her to be a sweet little girl. I also have a little information about her. DC 1997 21060 is stamped on the back of  her neck. I could not find the company online. So, I don't know what DC stands for.

I chose a wig I thought went well with her complexion and eye color. It was straight and best suited for a woman until I curled it with the boiling water method. For some reason the pictures don't do her justice of her in  the Auburn hair. She also got some brighter lipstick and a little acrylic rouge on her checks to look more cheery.

I tried this wig first. I thought it made her too mature looking. I wanted her to look like a sweet young girl after all she had been through. I do like it though.


I got an idea for this dress and made it in one sitting.  The plant next to where her right hand is pointing is exactly where she was buried.


I also made her sandals and bows.

I handled her so much I began to muss her hair. It can be touched up again. If it will not stay put I might just switch it back to the black wig. Which do you like best?
 
 There is still one mystery...most people suggested her eyes and mouth were swollen from either being buried or in the rain.  However, her body didn't seem to be swollen at all and they are made of the same materials...


Thursday, April 2, 2015

A Wedding Dress, Something old and Something New

A Wedding Dress

As promised, here is the lovely gown I won from Felma in three different locations . The Bridal shop is finished for the most part. Save for replacing a couple of glass shelves that fell off the walls. I was concerned it might throw off the colors since I used the all white gowns I made some time ago for the rack.
 
Now I see the picture frames go nicely with it and I will replace a couple of white gowns for other shades of white or maybe even a bright color or black.  I thought the gown looked nice in the boutique also. Fashion wise, my daughter and I went back and forth until she decided maybe a pretty gown could fit into a store targeting younger women and I agreed.

The seamstress' work room looks a little contrived because it has been going back and forth between being a bathroom and a sewing room. It once was looking pretty nice with all of the Victorian posters etc on the walls as a sewing room. For some reason I want to have a bathroom in every house. For this house it would really do better as a sewing room, but then where would they do all of their...well you know...

(Click on pics so they will be a little more visible)
I chose the bridal shop
It looks a lot better up close

It didn't look too bad here because it was center stage like it was being highlighted.

I also like it here. If I had the room fixed up again with sewing notions, fabric and posters as well as other completed or clothes in progress projects it would really make a statement.

 
What do you think?
Thanks again Felma!
******************************************************
 
Something Old?
 
 
One of the things keeping me from minis these days is gardening. The season was pushed back a little because of the cold weather, so we must hurry to prepare the ground for my seedlings.

 My grands and I were preparing the garden when my granddaughter started yelling! She came across this while she was doing some digging! It was in a shallow grave in a spot I thought I had dug at least once before. She and my grandson are convinced she is a voodoo doll someone buried there. I have no memory of having this doll although that does not mean I didn't at some time.  Anywho here she is. No hair. No clothes. No identity. We don't know where she came from.

Now, the question is do I clean her up and give her a make over or give her a tour of the bottom of a landfill ("garbage" for my international followers)
 
 
Kind of  Creature From The  Black Lagoon-ish

Her smile is sweet, but her eyes are downright scary!


*********************************************************************************

New High Tech Barbie- Good or Bad?
 
Here is an doll that just doesn't seem right. I like that this one has an average physique. I just don't think anything should be going over the internet by little children. There is always the chance the child can send something unsupervised. Anyway, who wants their child monitored by a stranger?


Read about it here!


Click on picture for a larger view

Friday, January 23, 2015

Moving Forward For More Fun in 2015!

Well, 2014 ended with a lot of difficulties. But, that is ok. There is always tomorrow I say. . I am going forward in a lot of areas besides miniatures and if you hold, on tightly I will take you with me! :-D Weee! lol I want you to have even more fun here with, me, The Grandmommy, this year and ever after!

I like this song and have decided it is going to be my theme song for 2015


I think I figured out who gets what and sent the gifts for all of the winners who sent their addresses. If I have left you out please let me know. It is never too late to get a treat in the mail! I should know this first hand...
 
Look at what Brini sent me!


Right smack in the middle of the year end drama...I get this box! In it was the cool chair with matching pillows, mirror and picture frame that I won on Brini's Doll Domain blog and oh, what is that? A gift card for Macy's department store. I was NOT expecting that! Nothing like a little retail therapy I always say!

I sat down with a cup of coffee on a quiet morning and opened the box! Then, I actually sat there playing with everything! I rearranged the pillows over and over and sat different dolls in the chair. LOL I have decided to make a roombox for them instead of putting them in one of the Barbie houses. I can't say thanks enough! She is such a generous sweetie, folks!


 I am inspired by the beginning of the year craft room organization of a few of my blogger friends. michellesmadworld @ http://wwwmichellesmadworld.blogspot.com/2015/01/2015-year-that-wasto-finish-what-ive.html     http://stalbertmini.blogspot.com/2015/01/off-to-good-start.html  and Brae at Otterine's Miniatures. As such, I have begun organizing and most importantly for me...labeling. In doing so, you know I found a lot of good craft-y stuff.

Some were very well organized, but since they were not labeled I didn't know where they were and what I even had in there! I am looking at these soap and candle making supplies really hard! I pulled them from one of those unlabeled, yet organized rolling drawers and spread it all out. Today is the day. I am going to attempt to make some really cool soaps 1:1 scale.  Once I get comfortable with that I want to make some 1:12 scale.

Hope I don't chicken out!

Hugs!
The Grandmommy


Click on picture for a larger view

Wednesday, December 17, 2014

Please Stand By...

Just wanted to let all of you know that I have not forgotten about you. I am having a few problems loading the prize pictures.  As soon as I get this fixed I will  announce winners and show prizes. Thanks for your patience!

Monday, December 8, 2014

First the FUN then the FUNK

 THE FUN!
I just won a mini prize from Carmen @  http://pekevasion.blogspot.com/2014/11/lo-prometido.html
Look at these adorable books!


They are even more adorable up close!
                                   Thanks Carmen!

The Chess-taurant has been demolished!
I follow several really professional level miniaturists. When I see them take things apart for improvements or upgrades, I am inspired to do the same.  That is where the unintentional demolition happened.
 At first my printer would not print properly so I could complete the window outdoor scene. Also, It bothered me that with the picture on the inside what should I do on the outside to show there was a window there. So, I took that to mean maybe I should go with my heart and actually cut out a window. I held my breath, went to the Woodworkers Guild work room and cut out the window. The supervisor there helped me practice cutting straight lines with the scroll saw. Well, that is where it got nasty. lol I ended up making a few gouges when I finally tried it on the wall .
Trying to be true to my determination to be like my professional friends I knew I had to cut out a whole new wall. I could have just made a big picture window by cutting out the two sections, but for some reason I didn't think it would be as cozy as having three panes.


The wall on the left if the second one. You can see the gouges on the first one on the right. I have to do a little more sanding and open another jar of paint so all the walls would be the same color.
I re-cut the window wall...still not to my total satisfaction, but something I could live with. When I dry fit it in place a little sunlight shone through and I knew I had done the right thing. :-) So, now it will just take a few more hours of work and the Chess-taurant will be truly complete. So look forward to seeing the new look soon!
OK, WHAT IS THIS?  
Sometimes when I keep walking past something it will call out to me. Just like this one did LOL!
Can you guess what new project I have added to all of my other projects? The next four pictures are clues. What do you think it will be when completed?


One day, maybe last year, I bought a large container of popsicle sticks. I decided to try using them for this project.
Part of the fun was reading the jokes on the backs of some of them!


I used some parchment paper to keep it from sticking  to the surface while I glued them together. Yep that is the price...thrift shop of course!
 
Thinking I should make this a contest...look for details later. :-)

 THE FUNK
Simply...to the fellow miniaturist who is saying those salacious (really bad for my foreign friends) things about The Grandmommy and discouraging people from my blog that is really mean and I would never do that to you. Like I tell my grands...Be kind !

I ask my fellow bloggers what would YOU say or do to someone who was doing that concerning you and your blog...

For my MANY miniature friends...thanks for being just that! HUGS!

Click on picture for a larger view

Tuesday, September 23, 2014

ALMOST THERE!


First, thank you, thank you, thank you to everyone who left those awesome comments! You have no idea how much that encourages me! Welcome to my new followers! Hugs to my, old, er, loyal followers/supporters! LOL I have been crazy busy these days! But, I just wanted to squeeze in a few pictures of some of the mini-ing I have been able to do. I constantly walk past the Chess-taurant, add/change something then keep moving until I can do a little more later!

 Since the last post, I have added the pictures on the wall, changed the bathroom signs (still king and queen), added wallpaper and chair rail to the back wall, added the cooler with the pot pies I made years ago, changed back to the original smaller counter-then added a new top to it, on the left wall you will see a little "free wifi" sign, changed window frame from gold to brown and on the back wall you will see a keep calm and play chess sign and a few other odds and ends. There are just a few more things left to do. Look for more teeny details when I am finished. I still have a bit of teeny and "big" items to add believe it or not! So far I am pretty happy with the way it is turning out. :-)

When I am finished I will go over all of the little tricks I learned along the way and go more into detail.

Be Back Soon!


I know the picture on the wall is crooked. My arm got tired trying to get them even! I will try again later :-/  Of course the cash register will not remain Barbie pink!


I like these two signs better.
They seem to go with the tone of the Chess-taurant better


I wanted to add the rest of the outdoor scene in the window, but my printer is making everything look red-ish for some reason...sigh
 

If you look at the picture above you will see this sign next to the "window" (yes, I know I need to trim that wood. I will explain later) The window frame gets another coat or so of paint


This customer went to the restroom...I wonder if it was the King or Queen? hmmm lol (pssst, do you know you left your e-reader on the table?)


I made these pot pies a couple of years ago just to try them out. Those are plastic Barbie cake slices. Sorry you can't see the credit cards we accept...we will take whichever one you have! :-)

That is a US penny sitting atop the chess set that someone is going to be playing with.

The counter stools are missing and getting some touch ups right now. The back wall is going to be filled up and other items added all over

This should be the next to last post on this project. The next post will show the finished product!

                              Remember, click on pictures for a larger view!

Thursday, September 11, 2014

CHESS-TAURANT UPDATE!

Hi everybody!

WOW! I can't believe I have not posted since July! I totally missed August! Well, I am here now and want to show you a few updates of the Chess-taurant. I plan to do a few things more tomorrow so I will be closer to finished or finished. There will be more details because we know how important details are for a mini scene. There are also wall etc. touch-ups

Sorry, everything looks a bit jumbled. This was just to share something with you in case I don't get to post again within the next few days. Things will be neater once finished.

Don't forget to tap on the pictures to make them bigger!


Front view. The scene from the window on the left is  from photo I took of the outside of the Chicago Art Institute. I still have one more panel to put in and work on the window frame 

Things are still a little out of place. The window frame is actually the mat from a picture frame painted gold. I don't think I will keep it that color. The right wall will have framed pictures.

Right under the posters on the wall will go a cooler. I made the barstools.
The bowl is one half of a party favor rattle. I will go more into detail on the other things in the next post.

Sorry you can't see this very well. These are chips I made from clay


I made the platter of sandwich rolls and the sparkling cider bottles were once bowling pins.

The right wall needed something so I decided to make it comfortable with a fireplace like Panera Bread or Atlanta Bread company restaurants.

This is the women's restroom. It says "Queen" on it and the men's says "Kings."
Sorry you have to turn your head to see it. lol I just couldn't seem to get it right side up!  I will have to take a better one
 HOPE YOU LIKE IT!
 
( I have more projects I have been working on to share with you soon!)
 
Click on picture for a larger view

Monday, June 16, 2014

Shelve It!

Hi Everybody!

Life should be slowing down in about a week or so. Then I will have more mini time (crossing fingers). I still think of them all of the time even when I can't get to them or blog about them. This post actually took me a week to get up!

I just had to show you this. I have had this idea for a long time. I finally decided to try it. Most of you probably already know about this trick. I wanted shelving and I didn't want to have to do a lot to get them looking right. You know, keep it simple. I also wanted the look of floating shelves with no brackets.

So, I bought some inexpensive microscope slides. The box of 72 came last week. I was anxious to try them out. I had to move everything around in the shops. When I put everything back in place, I know they will look great! Take a look at the shelves all over the place! I only had around 50 slides left within 15 minutes. LOL Perfect! Most of them went into the mall. I did put some in the Chess-taurant, though I really need to fix them better.

Now to order the slide covers for other ideas!

I had to make the pictures somewhat dark in order for you to see the shelves well.
CANDY STORE: I can put so many more goodies here now!
 
MEN'S STORE: Sorry I had to make it dark so you could see them better.
I also put some on the opposite wall


BRIDAL SHOP: The dove on top looks like he is flying, but he is on the glass shelf
 

SHOE STORE: On the upper left you can see more shelving.
 
 
This will be the new,
JEWELRY STORE:  You can be sure there will be shelves there too!

I do have a few tips for using them.

1. Try to keep them vertical while putting the glue on. I used superglue on most surfaces and just let it slide down the side.   After a few tries, you can do it without it getting glue on the flat shelf surface.

2. Remember you can not reposition if you use superglue so get it right the first time. It wouldn't stick on some wallpaper at all.

3. Once you get  superglue on the sticking side surface, you must clean it off well before trying to
 re-glue if it didn't stick the first time. It just won't stick to itself and the other surface.

4. Make sure the side you are gluing is flush against the wall so it won't be slanted when dried.


                                               Click on picture for a larger view